
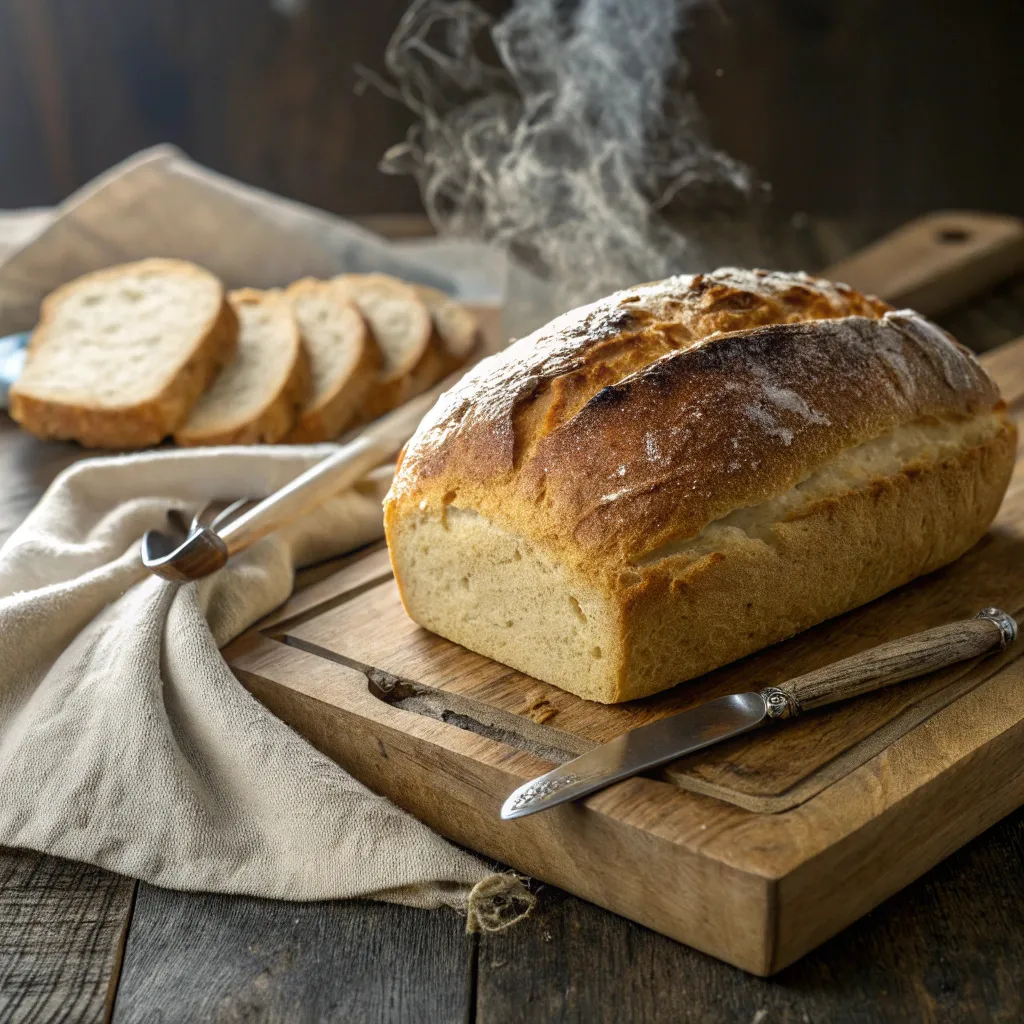
Hi there! I’m Mia, the creator behind Mialoaf.com — where I share feel-good baking recipes for every kitchen. My love for baking started when I was a kid, but everything changed when I learned how to make a gluten free sourdough loaf recipe that tasted just as good as the classic version. After countless experiments, I developed a go-to loaf that’s crusty, flavorful, and totally gluten-free. Whether you’re baking for dietary needs or just love the taste of sourdough, I’m here to guide you every step of the way. Let’s bake something beautiful — no gluten required!
I still remember the day I baked my first gluten free sourdough loaf. It was a gloomy Sunday, and my best friend — recently diagnosed with celiac disease — was coming over for brunch. Determined to serve something homemade, I dove into the world of gluten-free sourdough. The result? A slightly cracked, oddly shaped loaf… but it tasted divine. Since then, I’ve tested, tweaked, and perfected this gluten free sourdough loaf recipe, which has become a staple on my table.
Unlike traditional loaves, this recipe relies on a bubbly, active gluten-free starter and a mindful blend of flours to build the structure gluten normally would. This recipe is as satisfying to bake as it is to slice into — especially when you hear that perfect crust crackle. Plus, the tangy flavor unique to sourdough makes it irresistible. Now I bake it not just for friends, but to reconnect with the joy of making something from scratch that’s both nourishing and safe for everyone.
If you love gluten-free bakes, be sure to try my gluten-free cinnamon rolls or dive into the cozy flavors of my buckwheat banana bread. This blog is filled with recipes made to feel good and taste better.
Table of Contents
Table of Contents
Why This Loaf Works So Well
The magic in this gluten free sourdough loaf recipe comes from combining science with soul. A high-hydration dough boosts structure and crumb, while psyllium husk mimics the elasticity gluten provides. The result is a chewy interior with that beautiful open crumb — something gluten-free bread rarely achieves. And unlike store-bought versions that taste dry or overly sweet, this one offers deep, real sourdough flavor from an active wild starter.
Looking for more gluten-free essentials? Don’t miss my gluten-free sandwich bread — a soft, sliceable favorite — or learn to build your own starter from scratch with my wild gluten-free sourdough starter guide.
Choosing the Right Flours for a Gluten-Free Sourdough Loaf
The heart of any good gluten free sourdough loaf recipe lies in the flour blend. Gluten-free baking isn’t just about swapping one flour for another — it’s about creating a balanced mix that offers structure, moisture, and flavor. For this loaf, I recommend a combination of brown rice flour, sorghum flour, and tapioca starch. Brown rice flour provides a mild base, sorghum adds a gentle sweetness and structure, and tapioca starch offers stretch and chew, similar to gluten.
You’ll also need psyllium husk. It’s non-negotiable — this ingredient forms a gel that traps air from the starter, creating lift and structure. Skip the xanthan gum here; it often makes the loaf dense or rubbery.
For more tips on baking without gluten, visit my guide on gluten-free flour blends, or see how I use similar combinations in my gluten-free focaccia recipe — it’s one of the most popular on the blog!
Mastering the Gluten-Free Sourdough Starter
You can’t have a gluten free sourdough loaf recipe without a thriving starter. The good news? You can make a gluten-free starter at home in about 5–7 days using only brown rice flour and water. Feed it twice daily, keep it in a warm spot, and wait for that glorious bubble action.
A mature gluten-free starter should be airy, smell pleasantly tangy, and double in volume within 4–6 hours of feeding. If you’re not quite there yet, don’t rush it — a strong starter is the backbone of your loaf’s rise and flavor.
Want a detailed walkthrough? Head to my gluten-free sourdough starter tutorial and follow along.
Ingredients, Tools & Method for the Perfect Gluten Free Sourdough Loaf Recipe

Ingredients
Here’s what you’ll need to make a tangy, chewy, gluten free sourdough loaf:
For the dough
- 1 ¼ cups (160g) sorghum flour
- ¾ cup (90g) brown rice flour
- ½ cup (60g) tapioca starch
- 1 tbsp psyllium husk powder
- 1 ½ tsp fine sea salt
- 1 tbsp olive oil
- ¾ cup (180g) active gluten-free sourdough starter
- 1 cup (240ml) warm filtered water
Optional (but recommended)
- 1 tsp apple cider vinegar (adds structure and tang)
- ½ tsp honey or maple syrup (feeds the starter during bulk fermentation)
Tools & Equipment
You don’t need fancy gear, but these items make the process easier and more consistent:
| Tool | Purpose |
|---|---|
| Kitchen scale | For precise measurements |
| Mixing bowl | For combining ingredients |
| Dough whisk or spatula | To mix wet and dry evenly |
| Proofing basket (or bowl with towel) | To shape and rest your dough |
| Dutch oven or lidded baking dish | Creates steam and crust |
| Lame or sharp knife | To score the loaf |
Method (Step-by-Step)

1. Mix your dry ingredients
In a large bowl, whisk together the sorghum flour, brown rice flour, tapioca starch, salt, and psyllium husk. This ensures even hydration and structure.
2. Add the wet ingredients
Pour in the warm water, active sourdough starter, olive oil, and vinegar. Stir until a thick dough forms — it will look like a sticky batter rather than a traditional dough.
3. Rest and hydrate (Autolyse)
Cover the bowl and let the dough rest for 45 minutes at room temperature. This allows the psyllium to form its gel-like texture and helps the flours hydrate.
4. Bulk fermentation
Cover again and let rise in a warm spot (70–75°F) for 4–6 hours, or until it increases in volume by about 50%. Don’t expect it to double — this is normal for gluten-free sourdough.
5. Shape the loaf
Dust your proofing basket or a bowl lined with a tea towel with rice flour. Gently scoop the dough in and smooth the top. Cover and place in the fridge overnight (8–12 hours) for cold proofing.
6. Preheat the oven
Place a Dutch oven (with lid) into the oven and preheat to 475°F (245°C) for 45 minutes before baking. This high heat helps the loaf spring and brown.
7. Bake the loaf
Carefully remove the hot Dutch oven. Turn the dough out onto parchment paper, score the top with a lame or knife, then lift the parchment into the pot. Cover and bake for 30 minutes. Uncover and bake an additional 25–30 minutes until deeply golden.
8. Cool completely
Remove the bread and let it cool on a wire rack for at least 3–4 hours. Cutting too soon will ruin the crumb — patience is key!
Notes
- Starter not ready yet? Use my guide to building a gluten-free sourdough starter first and give it 5–7 days.
- If your loaf feels gummy, it might need a longer final bake. Try leaving it in the oven (off, door cracked) for 10 minutes after baking.
- Store leftovers wrapped in a towel or in a bread box for up to 3 days. Freeze slices for longer storage.
Gluten-Free Sourdough Loaf Troubleshooting & Serving Tips
How to Fix Common Issues with Your Gluten Free Sourdough Loaf
Gluten free sourdough baking can feel intimidating at first, but most problems have easy fixes. Let’s break down the most common issues in any gluten free sourdough loaf recipe and how to solve them:
Loaf didn’t rise enough?
Your starter may not be strong enough. Try feeding it twice daily for a few days to boost its activity. Also, make sure your dough is proofing in a warm spot — below 70°F and fermentation slows significantly.
Gummy or dense crumb?
This often means the loaf was underbaked. Try baking 10–15 minutes longer or leave the bread in the oven (off, door cracked) for 10 minutes after baking. Also double-check your psyllium measurement — too much holds in moisture.
Crust too soft?
This usually happens when there’s not enough initial steam or you skip the Dutch oven. Bake the loaf uncovered during the last 25–30 minutes to crisp things up. For an extra golden crunch, brush the top with a little olive oil.
Still unsure? You might enjoy reading my in-depth troubleshooting guide for gluten-free bread baking — packed with visual cues and expert tips to help you learn by feel and sight.
Texture, Flavor & How to Serve It Right
A perfect gluten free sourdough loaf recipe gives you a chewy, airy crumb with a mildly tangy taste — just enough to keep each bite interesting. Thanks to the psyllium husk, this loaf slices beautifully and holds its shape for sandwiches, toasts, or even French toast.
Here’s how I love to serve it:
- Warm with a generous smear of butter and sea salt
- Toasted with smashed avocado and a poached egg
- As open-faced tartines with roasted veggies and hummus
- Thinly sliced for a savory gluten-free grilled cheese
Pro tip: If the bread is a bit stale after a couple of days, try grilling it with olive oil or using it in your favorite gluten-free stuffing — it soaks up flavors beautifully.
This loaf also makes a great gift. Wrap it in parchment and tie with twine for a rustic, heartfelt touch.

Why This Gluten Free Sourdough Loaf Recipe Is a Weekly Essential
Nutritional Benefits You’ll Love
A gluten free sourdough loaf recipe isn’t just about removing gluten — it’s about creating something your body and taste buds will thank you for. Unlike store-bought loaves packed with gums and preservatives, this homemade version is rich in fiber, easy to digest, and made from whole, nourishing ingredients.
Thanks to fermentation, this sourdough is gentler on your gut. The natural bacteria help pre-digest starches and break down anti-nutrients like phytic acid, making the nutrients in your flours more bioavailable. It also has a lower glycemic impact than commercial gluten-free breads — meaning no blood sugar crashes after breakfast.
If you’re building a gluten-free lifestyle filled with feel-good bakes, don’t miss my quinoa flour pancakes or protein-packed chickpea flour muffins for easy weekday wins.
Storage Tips to Keep It Fresh
Homemade gluten free sourdough doesn’t contain preservatives — and that’s a good thing. But it also means you’ll want to store it right for peak flavor and texture:
- Room temperature: Wrap in a clean towel and keep in a bread box or paper bag for up to 3 days.
- Refrigerate? Not recommended — it dries out the crumb quickly.
- Freezing: Slice the loaf, wrap individual slices in parchment, and store in a freezer bag for up to 2 months. Toast straight from frozen.
Reheat in the oven at 325°F for 8–10 minutes for that freshly-baked taste. Want to turn your leftovers into a crave-worthy treat? Use them for my cinnamon sourdough toast — it’s a crowd-pleaser.
Once you bake this loaf, you’ll see why it earns a permanent spot in your rotation. It’s a wholesome ritual, a cozy weekend project, and a loaf that fits beautifully into everything from brunch to busy midweek meals.
Frequently Asked Questions (FAQ)
How do I make a gluten free sourdough starter?
You can make one by mixing equal parts brown rice flour and filtered water, feeding it daily for 5–7 days. Keep it in a warm spot and wait for bubbles and doubling. I explain it all in my step-by-step gluten free starter guide.
Why is my gluten free sourdough loaf gummy inside?
Gummy texture often means it’s underbaked. Try extending the baking time by 10–15 minutes or leave the bread in the oven (off, door cracked) for 10 minutes after baking. Also ensure your psyllium measurement is accurate.
Can I use almond flour in this recipe?
Almond flour doesn’t work well in this specific recipe, as it lacks starch for structure. Stick to whole grain flours like sorghum and brown rice for the best results.
How should I store gluten free sourdough bread?
Wrap it in a clean towel or store in a paper bag at room temperature for up to 3 days. For longer storage, slice and freeze. Avoid the fridge — it dries the bread out quickly.
Conclusion
If you’ve been searching for a go-to gluten free sourdough loaf recipe that actually tastes like real bread — chewy, crusty, tangy — this is it. From the joy of mixing your own dough to the satisfaction of hearing that first slice crackle under a bread knife, this recipe delivers on all fronts.
Whether you’re baking for health reasons or just love a challenge in the kitchen, this loaf proves that gluten-free baking can be better than expected. Save it, share it, and bake it again — and don’t forget to show off your loaf by pinning it!
→ Pin this recipe and more on my Pinterest: https://pinterest.com/mialoaf
Print
Gluten Free Sourdough Loaf Recipe: Easy, Chewy & Naturally Delicious
- Total Time: 1 hour 10 minutes
- Yield: 1 loaf 1x
Description
This gluten free sourdough loaf recipe bakes up with a golden crust, chewy open crumb, and classic sourdough tang — all without gluten or gums.
Ingredients
1 ¼ cups (160g) sorghum flour
¾ cup (90g) brown rice flour
½ cup (60g) tapioca starch
1 tbsp psyllium husk powder
1 ½ tsp fine sea salt
1 tbsp olive oil
¾ cup (180g) active gluten-free sourdough starter
1 cup (240ml) warm filtered water
1 tsp apple cider vinegar (optional)
½ tsp honey or maple syrup (optional)
Instructions
1. Mix dry ingredients in a large bowl.
2. Add starter, water, oil, and vinegar; stir into thick dough.
3. Let rest 45 minutes to hydrate.
4. Cover and ferment 4–6 hours in warm place.
5. Transfer to floured basket, smooth top.
6. Cold proof in fridge overnight (8–12 hours).
7. Preheat oven and Dutch oven to 475°F for 45 minutes.
8. Turn dough onto parchment, score, and bake covered 30 min.
9. Uncover and bake another 25–30 min until golden.
10. Cool on rack at least 3 hours before slicing.
Notes
Use only an active starter that doubles after feeding.
Don’t refrigerate bread — slice and freeze instead.
Let the loaf cool completely before slicing for best texture.
- Prep Time: 15 minutes
- Cook Time: 55 minutes
- Category: Bread
- Method: Baking
- Cuisine: Gluten-Free, Sourdough
Nutrition
- Serving Size: 1 slice
- Calories: 140
- Sugar: 0.5g
- Sodium: 210mg
- Fat: 2g
- Saturated Fat: 0.3g
- Unsaturated Fat: 1.5g
- Trans Fat: 0g
- Carbohydrates: 28g
- Fiber: 3g
- Protein: 2.5g
- Cholesterol: 0mg