

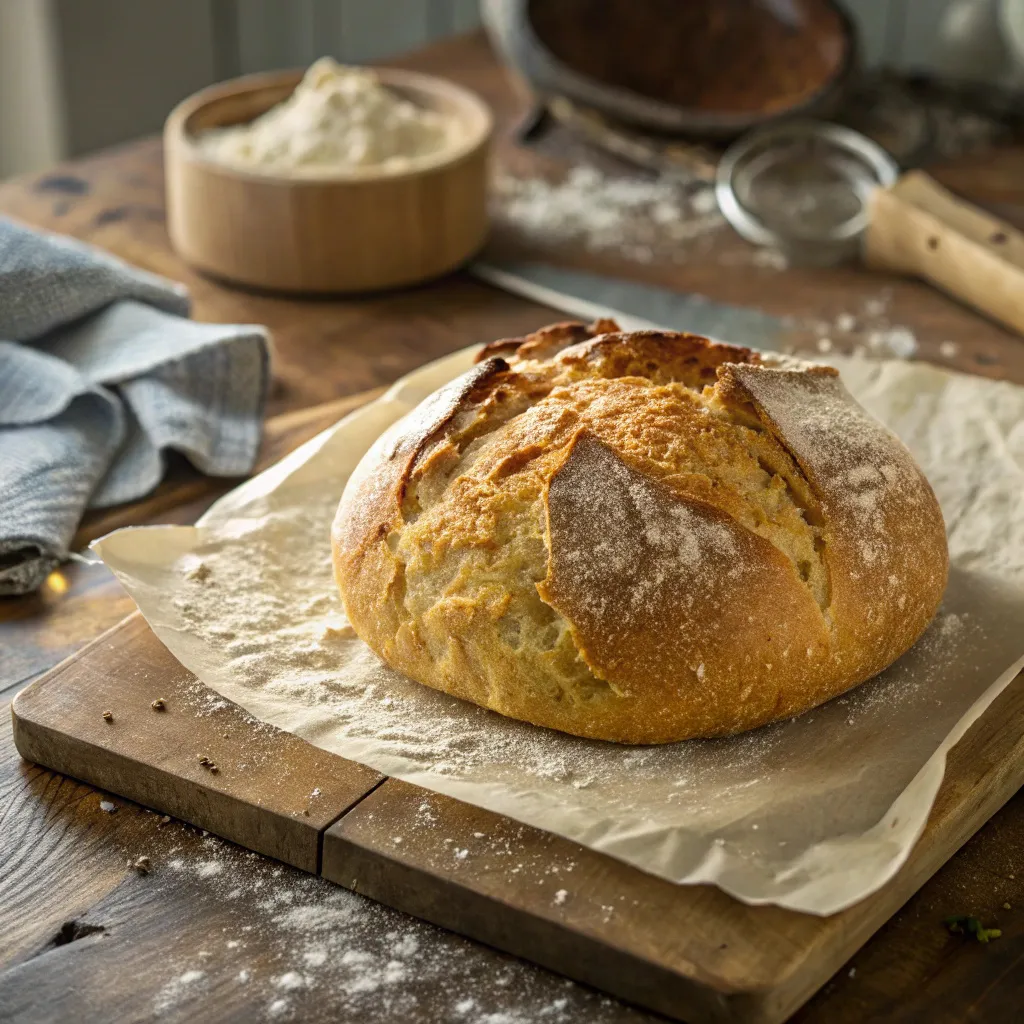
When I first tried gluten-free baking, I’ll admit it—it felt like stepping into uncharted territory. The dense, crumbly loaves, the strange starch combos, and the frustration of recipes that never quite worked. But everything changed the day I stumbled across a no knead bread recipe and asked myself, “Can I make this gluten-free?” The result? A soft, chewy, crusty loaf that rivaled any traditional boule—and I didn’t even break a sweat. This no knead bread gluten free version became a staple in my kitchen and a huge hit on mialoaf.com.
No knead bread is a game-changer for those of us who love baking but hate fuss. And once I learned the trick to adapting it for gluten-free flours, I knew I had to share it. This bread requires just one bowl, a bit of patience, and no fancy equipment. It’s a perfect project for weekend mornings or cozy afternoons.
You’ll find many traditional-style gluten-free breads that rely on eggs or gums for structure, but my recipe embraces whole-food ingredients and smart fermentation instead. This dough sits, ferments, and transforms—all while you do literally nothing. If you’re skeptical, that’s fair. I was too. But when I pulled my first loaf out of the oven and cracked into that golden crust, I couldn’t believe it wasn’t wheat-based.
Table of Contents
Table of Contents
Why No Knead Gluten-Free Bread Works
The secret is in time and hydration. Gluten-free flours don’t develop elasticity, but they hydrate and gel with enough water and time. Fermentation gives structure and tang, while a high-moisture dough ensures a soft crumb. The result? A beautiful rise, tender inside, and crispy crust—just like traditional artisan bread.
You can find more foundational tips on gluten-free baking in my gluten-free desserts collection and explore easy weeknight loaves for more inspiration.
Mastering the Method of No Knead Bread Gluten Free

Choosing the Right Gluten-Free Flours
If you’ve ever baked with gluten-free flours, you know: not all blends are created equal. The key to successful no knead bread gluten free recipes is finding the perfect balance between starch and structure. A good base usually includes a mix of whole grain gluten-free flours like sorghum or brown rice flour combined with starches such as tapioca or potato. Avoid using a single flour—it won’t give you the chew or rise you want.
For this method, I prefer a custom blend: 1 part brown rice flour, 1 part sorghum flour, 1 part tapioca starch, and a small amount of psyllium husk. Psyllium is a natural fiber that mimics gluten’s elasticity without the aftertaste of gums. It’s the “secret weapon” behind a sturdy, sliceable loaf.
Pre-mixed gluten-free flour blends can work, too—just be sure they don’t contain too much xanthan gum, which can make the dough rubbery. You can see which flours I recommend in my top gluten-free pantry guide and favorite baking blends.
Understanding Hydration & Fermentation
Gluten-free no knead dough is wet. Much wetter than typical wheat-based doughs. Don’t panic—it’s supposed to look more like thick pancake batter than traditional bread dough. This extra hydration helps the starches absorb water fully, and it’s what gives you a soft, open crumb instead of a dense block.
Let the dough rest at room temperature for 12 to 18 hours. During this time, natural fermentation happens. That long, slow rise develops flavor and helps the dough set into a cohesive structure—even without kneading. You can even experiment with a touch of apple cider vinegar or a pinch of sugar to speed fermentation in cooler kitchens.
Ingredients, Method & Notes
Ingredients for One Gluten-Free No Knead Bread Loaf:
- 1 cup brown rice flour
- 1 cup sorghum flour
- 1 cup tapioca starch
- 1 tbsp whole psyllium husk
- 1½ tsp salt
- 1 tsp instant yeast
- 1¾ cups warm water (plus up to 2 tbsp more if needed)
- 1 tsp apple cider vinegar (optional, for better rise and flavor)
Step-by-Step Method:

- Mix the Dry Ingredients
In a large mixing bowl, whisk together brown rice flour, sorghum flour, tapioca starch, psyllium husk, salt, and yeast. - Add the Wet Ingredients
Pour in the warm water and vinegar (if using). Stir with a wooden spoon until a thick, wet batter forms. It will look shaggy and loose—perfect. - Let It Rest
Cover the bowl with a clean towel or plastic wrap. Leave at room temperature for 12 to 18 hours. The dough should double in size and have bubbles on top. - Shape & Second Rise
Transfer dough to a parchment-lined bowl or proofing basket. Dust the top with flour and cover for another 1 to 2 hours to rest. - Preheat Oven & Dutch Oven
Place a Dutch oven (or heavy lidded pot) inside your oven and preheat to 450°F (232°C) for at least 30 minutes. - Bake the Bread
Carefully place the dough (on parchment) into the hot Dutch oven. Cover with the lid and bake for 45 minutes. Remove the lid and bake for 15 more minutes until the crust is deep golden. - Cool Before Slicing
Let the bread cool for at least 1 hour before slicing. This allows the crumb to set.
Recipe Notes:
- You can swap sorghum flour for millet or oat flour.
- Psyllium husk must be whole, not powder, for proper gelling.
- If you don’t have a Dutch oven, bake on a sheet pan and add a pan of hot water to the oven to create steam.
- Store leftovers in a paper bag or airtight container for up to 3 days, or freeze sliced.
For more naturally gluten-free bakes, explore my classic cornbread and rustic grain-free crackers—perfect sidekicks to this loaf!
The Trick to Making Good Gluten-Free Bread
Gluten-free bread can be intimidating, but the no knead bread gluten free method simplifies everything. The biggest trick? Trust the process—especially the long fermentation. Unlike conventional doughs that rely on gluten for elasticity, gluten-free versions need time to hydrate fully and develop structure through binding agents like psyllium husk.
One of the most common issues is dense or gummy loaves. That usually means your dough didn’t hydrate enough, or it wasn’t baked long enough. Since gluten-free flours absorb water slowly, that overnight rest is essential. Another helpful tip: always let the bread cool fully before slicing. Cutting into it too early releases steam and collapses the structure.
Many beginners also wonder if they can substitute chia seeds or flax for psyllium. While these work in some recipes, they don’t provide the same elasticity and chew that psyllium does. For best results, stick with whole psyllium husk—it’s inexpensive and reliable.
Why the No Knead Method Works for Gluten-Free
Without gluten, there’s no network of stretchy proteins to trap air. That’s why kneading isn’t necessary—or even helpful—in gluten-free baking. Instead of kneading to build strength, we allow time and moisture to create a gel-like matrix. The dough becomes self-supporting as it ferments and rises slowly.
By skipping the kneading step, we reduce handling and prevent overworking the starches. This keeps the crumb tender and airy. Plus, it’s just easier. No stand mixer, no floured counters, no sore arms. You mix, cover, rest, and bake. That’s it.
For even more ease, you can prepare the dough in advance and refrigerate it overnight—just bring it to room temperature before shaping. You’ll find this method matches perfectly with the slow-living rhythm we celebrate in recipes like my overnight oat muffins or easy prep brunch bakes.
Easy Ingredient Swaps & Add-Ins

Once you’ve mastered the base recipe for no knead bread gluten free, it’s time to get creative. This method is incredibly flexible, making it easy to tailor to your taste or pantry. Want a more rustic, hearty flavor? Swap brown rice flour for buckwheat or teff. Looking for a lighter, sandwich-style loaf? Use a blend of white rice flour and cornstarch for a fluffier crumb.
You can also fold in flavor-packed add-ins just before the first rise. Think chopped rosemary, roasted garlic, olives, or sun-dried tomatoes. For a touch of sweetness, try cinnamon with a swirl of maple syrup or dried cranberries.
Here’s a pro tip: add 2 tablespoons of seeds (like flax, sesame, or pumpkin) for texture and nutrition. Just don’t overdo it—too many mix-ins can weigh down the loaf. I share more customizable ideas in my artisan-inspired loaf variations and easy gluten-free focaccia recipes.
Serving Suggestions & Storage Tips
Serve this no knead bread warm with dairy-free butter, a bowl of soup, or olive oil and herbs. It also makes a terrific base for avocado toast or a gluten-free bruschetta. For breakfast, toast it and spread with almond butter and banana slices.
This loaf stores well at room temperature for two days and in the fridge for up to a week. To revive slices, pop them in the toaster or warm in the oven at 300°F for 5 minutes. Freeze extra slices with parchment between them to reheat straight from frozen.
With its crispy crust and chewy center, this bread is a real crowd-pleaser. And once you’ve made it once, you’ll be dreaming up your own spins on it—just like I did in my classic no knead gluten-free rolls and more.
Frequently Asked Questions
What is the trick to making good gluten-free bread?
The key to making good gluten-free bread is proper hydration and using the right blend of flours with a binder like psyllium husk. In no knead bread gluten free recipes, allowing a long fermentation time helps improve flavor, texture, and structure without needing gluten.
Can gluten form without kneading?
No, gluten cannot form without kneading—because gluten itself comes from wheat proteins that develop elasticity when worked. However, gluten-free bread doesn’t need gluten. Instead, it uses binders like psyllium husk to mimic that structure. So yes, bread can still rise and hold shape without kneading, especially when it’s gluten-free.
Is Ezekiel bread gluten-free?
Ezekiel bread is not gluten-free. It’s made from sprouted whole grains, including wheat and barley, which naturally contain gluten. For those with celiac disease or gluten sensitivity, Ezekiel bread is not a safe option. Instead, opt for certified gluten-free loaves like this no knead bread gluten free recipe.
Can you make bread without kneading?
Absolutely. That’s the beauty of no knead bread! Time replaces the work of kneading by allowing the dough to ferment and develop naturally. This works especially well for gluten-free bread, where traditional kneading isn’t needed. It’s perfect for home bakers who want great results with less effort.
Conclusion
Gluten-free baking doesn’t have to mean sacrificing flavor, texture, or ease. This no knead bread gluten free recipe proves you can make bakery-quality bread with just a bowl, spoon, and a little patience. Whether you’re baking for dietary needs or just love good bread, this method delivers every time.
I hope this inspires you to try your own variations and embrace the simplicity of slow-rise baking. For more cozy and reliable gluten-free recipes, explore my latest bakes here and start making your kitchen the happiest room in your home.
Print
No knead bread gluten free
- Total Time: 13–20 hours (includes fermentation)
- Yield: 1 loaf 1x
Description
This no knead bread gluten free recipe delivers a chewy, crusty artisan-style loaf with minimal effort. Naturally dairy-free and perfect for beginners.
Ingredients
1 cup brown rice flour
1 cup sorghum flour
1 cup tapioca starch
1 tbsp whole psyllium husk
1½ tsp salt
1 tsp instant yeast
1¾ cups warm water
1 tsp apple cider vinegar (optional)
Instructions
1. Whisk all dry ingredients in a large bowl.
2. Add warm water and vinegar; stir until combined.
3. Cover and rest at room temp for 12–18 hours.
4. Transfer to parchment-lined bowl and rest 1–2 hours more.
5. Preheat Dutch oven to 450°F (232°C).
6. Place dough into hot Dutch oven; bake 45 minutes covered.
7. Remove lid; bake 15 more minutes uncovered.
8. Cool completely before slicing.
Notes
Use whole psyllium husk, not powder.
Swap sorghum flour with oat or millet as needed.
Add herbs, seeds, or olives for variations.
Bread must cool before slicing to avoid gummy texture.
- Prep Time: 10 minutes
- Cook Time: 1 hour
- Category: Gluten-Free Bread
- Method: No Knead, Dutch Oven
- Cuisine: Rustic, Artisan
Nutrition
- Serving Size: 1 slice (1/10 loaf)
- Calories: 120
- Sugar: 0g
- Sodium: 290mg
- Fat: 1g
- Saturated Fat: 0g
- Unsaturated Fat: 1g
- Trans Fat: 0g
- Carbohydrates: 25g
- Fiber: 3g
- Protein: 2g
- Cholesterol: 0mg
1 thought on “No Knead Bread Gluten Free: Simple, Chewy & Crusty Perfection”