
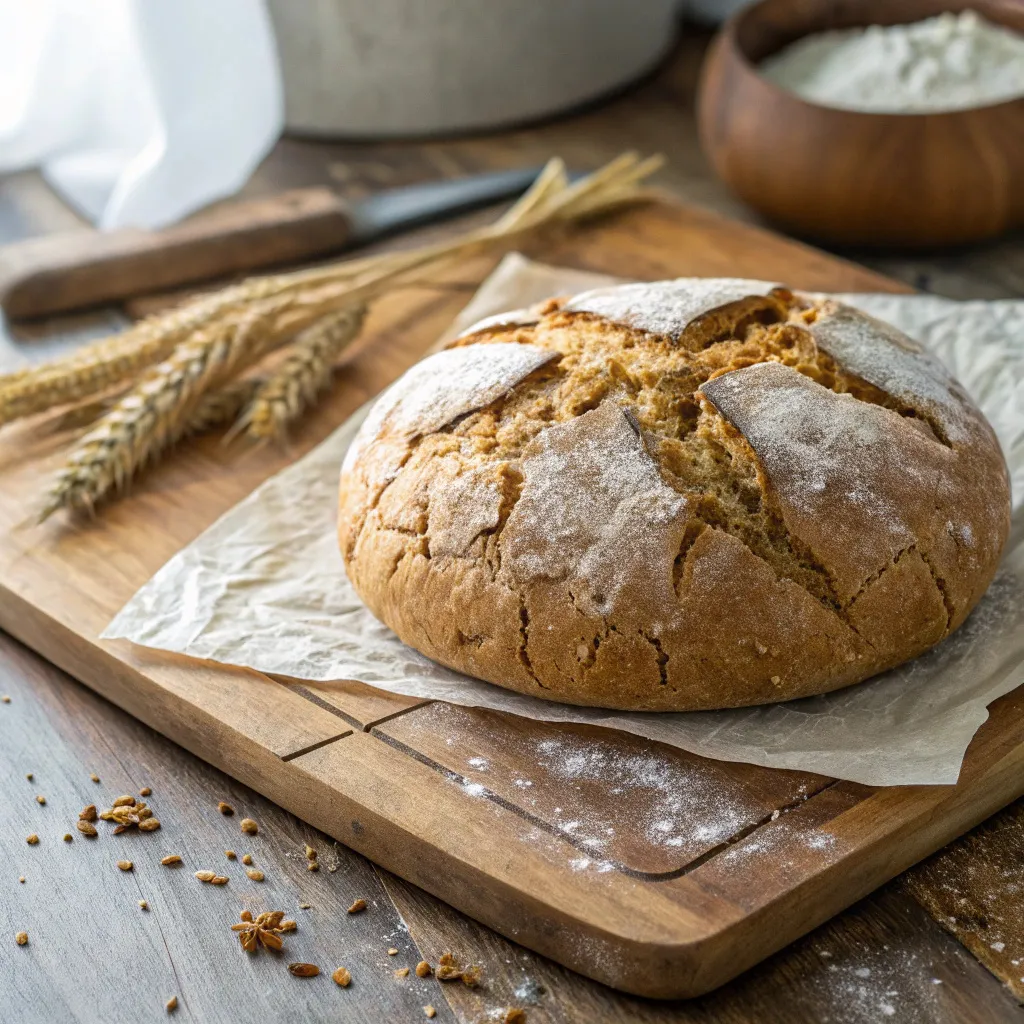
When I first started experimenting with vegan gluten free artisan bread, I was honestly skeptical. Traditional dough—full of stretchy gluten and rich dairy—felt like an essential part of artisan baking. But after a friend was diagnosed with celiac disease and I went fully plant-based, I took it as a challenge. Could I still bake bread that had that golden crust, airy crumb, and rich flavor without the staples I’d come to rely on?
What followed was a blend of trial, error, and the occasional kitchen meltdown. I remember a particular weekend spent elbows-deep in rice flour and psyllium husk, trying to mimic that classic chew of a crusty loaf. After many dense disasters, I finally hit on the right balance of moisture, fermentation time, and flour blend. The smell of the dough rising—earthy, tangy, full of promise—became something I looked forward to. The moment I pulled that first perfect vegan gluten free artisan bread out of the oven? Pure triumph.
Why This Bread is Worth the Effort
What I love most is how this bread bridges gaps—between gluten-free and traditional, vegan and omnivore. It’s packed with flavor from a slow ferment, enriched with whole grains, and versatile enough to pair with soup or serve as the base for a hearty sandwich. And the best part? No fancy equipment required. If you have a bowl, an oven, and some patience, you’re all set.
For more gluten-free baking inspiration, you can explore my banana oat muffins or dig into my gluten-free lemon poppy seed loaf—both reader favorites.
Table of Contents
Table of Contents
Mastering the Basics of Vegan Gluten Free Artisan Bread
The Right Flours Make the Loaf
When making vegan gluten free artisan bread, your flour blend is everything. Since there’s no gluten to create structure, you need a mix of whole grain and starch to achieve the right texture. My go-to combo? Brown rice flour for depth, sorghum flour for softness, and tapioca starch for lightness. Each flour brings something unique, and together, they form a base that mimics traditional bread beautifully.
If you’re new to these ingredients, don’t stress. These are easily found at most natural food stores or online. You can even pre-mix a batch and store it for quick baking days. For another flour-focused bake, check out my vegan almond flour shortbread cookies—a reader-loved treat with an irresistible crumb.
Why Psyllium Husk is Your Best Friend
Forget xanthan gum. For artisan loaves, psyllium husk is the gold standard. It creates that classic chewy texture while helping the dough retain moisture and rise with structure. Think of it as the gluten whisperer in this vegan world—it binds the dough, prevents crumbling, and improves the crumb like magic.
I typically use 1 tablespoon of whole psyllium husk per cup of flour, hydrated in warm water. It turns into a gel that behaves similarly to egg whites, offering elasticity and volume. It’s also fiber-rich, which makes this bread even more satisfying.
Using a Dutch oven or heavy pot with a lid helps retain steam during baking, creating that iconic crust. Want more on steam-baking techniques? You might enjoy my post on homemade crusty no-knead bread.
In the next section, we’ll get hands-on with ingredients, step-by-step methods, and pro tips for success every time.
Ingredients, Method & Notes

Ingredients (One 8-inch round loaf)
- 1 cup brown rice flour
- ¾ cup sorghum flour
- ¾ cup tapioca starch (or arrowroot)
- 2 tbsp ground flaxseed
- 1 tbsp whole psyllium husk
- 1½ tsp sea salt
- 1 tbsp maple syrup (optional for flavor depth)
- 1 packet (2¼ tsp) instant yeast
- 1½ cups warm water (100–110°F)
- 1 tbsp olive oil (plus more for coating)
- Optional: 1 tsp apple cider vinegar (improves rise and flavor)
Method (Detailed Steps)

1. Activate the yeast:
In a small bowl, combine the warm water, maple syrup, and yeast. Stir gently and let sit for 5–10 minutes until bubbly. This ensures your yeast is alive and ready to rise.
2. Prepare the psyllium gel:
In a separate bowl, stir psyllium husk into ¾ cup water. Let it sit for 2–3 minutes until it thickens into a gel-like consistency. This replaces eggs and gluten structure.
3. Mix the dry ingredients:
In a large mixing bowl, whisk together brown rice flour, sorghum flour, tapioca starch, flaxseed, and salt. Make sure there are no clumps.
4. Combine wet and dry:
Add the yeast mixture, psyllium gel, olive oil, and vinegar (if using) to the dry ingredients. Mix with a spatula or stand mixer (dough hook attachment) until it forms a sticky, thick batter. It won’t feel like elastic wheat dough—don’t worry.
5. First rise:
Lightly oil a bowl, place the dough inside, and cover with a damp towel or plastic wrap. Let it rise for 1.5 hours in a warm, draft-free spot until puffed and slightly domed.
6. Shape the loaf:
Transfer the dough onto a parchment-lined surface. Dust lightly with sorghum flour and shape it into a round loaf using wet hands or a spatula. Don’t over-handle—this dough is delicate.
7. Second rise (optional but recommended):
Cover with a towel and let the shaped loaf rise again for 30–45 minutes while the oven preheats.
8. Preheat oven with Dutch oven inside:
Place your Dutch oven with the lid in the oven and preheat to 450°F (230°C). Preheating the pot helps form that crusty exterior.
9. Score and bake:
Carefully place the risen dough with parchment into the hot Dutch oven. Score the top with a sharp knife or lame for even rise. Cover and bake for 30 minutes.
10. Remove lid and finish baking:
Uncover and bake another 25–30 minutes until the crust is deep golden brown and sounds hollow when tapped.
11. Cool completely:
Remove the loaf and let it cool on a wire rack for at least 1 hour. This sets the crumb and prevents gumminess.
Notes for Success
- Don’t skip the psyllium gel—it’s the backbone of structure in this recipe.
- If you don’t have a Dutch oven, bake on a stone or steel with a tray of hot water on the lower rack to mimic steam.
- For variations, add fresh rosemary, olives, or sun-dried tomatoes during shaping.
- Bread slices beautifully after 6–8 hours or the next day.
- To reheat: toast or bake slices at 350°F for 5 minutes for that fresh-from-the-oven feel.
Try pairing it with a warm bowl of vegan creamy tomato soup or topping it with cashew herb spread for a delightful plant-based combo.

Troubleshooting and Storage for Vegan Gluten Free Artisan Bread
Common Baking Challenges (And How to Fix Them)
Even the best bakers hit bumps when working with gluten-free dough, especially when it’s vegan. One of the most frequent complaints? Dense or gummy bread. This usually comes from too much moisture or underbaking. If your loaf feels sticky in the middle even after cooling, try reducing the water by 2 tablespoons next time or extend the final bake (uncovered) by 10 more minutes.
Another issue is lack of rise. This can result from expired yeast, cool rising environments, or skipping the second proof. Always test your yeast and give your dough a cozy corner—like near a window or pre-warmed oven (turned off). Psyllium husk also plays a key role in giving your bread height, so don’t leave it out or replace it without adjusting water ratios.
If your crust is too hard, cover the bread with foil halfway through baking or mist the oven lightly to increase steam. On the flip side, if your crust is pale or soft, remove the lid earlier or increase the uncovered time.
Looking for soft-style bread? Check out my vegan sandwich loaf that stays tender without gums or eggs.
Best Practices for Storage
To store your vegan gluten free artisan bread and maintain freshness:
- Room temperature: Keep the cooled loaf in a paper bag or wrapped in a clean towel for up to 2 days. Avoid airtight containers—they trap moisture and create a gummy texture.
- Freezer: Slice the cooled loaf and freeze slices between parchment. Reheat in a toaster or warm oven at 350°F (180°C) for 5–8 minutes.
- Reviving stale slices: Sprinkle lightly with water and toast or pan-grill to refresh the crust.
For bread that lasts all week and beyond, I always recommend slicing and freezing—easy, fresh, and waste-free.
Flavor Variations & Serving Ideas for Vegan Gluten Free Artisan Bread
Creative Flavor Add-ins
Once you’ve mastered the base recipe, it’s time to play. This rustic loaf adapts beautifully to all sorts of flavors. Try these popular add-ins to elevate your next batch:
- Savory lovers: Add 1 tablespoon chopped fresh rosemary and ¼ cup kalamata olives for a Mediterranean twist.
- Cheesy craving? Sprinkle 2 tablespoons of nutritional yeast into the dough for an umami-rich, “cheesy” note.
- Hearty and rustic: Mix in 2 tablespoons of toasted sunflower seeds or chopped walnuts for texture and earthiness.
- Sweet touch: Swirl in ¼ cup dried cranberries and a pinch of cinnamon for a holiday-inspired loaf.
When adding mix-ins, fold them in gently after the dough is initially combined, just before the first rise. This ensures even distribution without deflating the structure. I often rotate between savory and nutty, depending on the season or what I’m serving alongside.
You can find similar infusion inspiration in my vegan spiced pumpkin loaf—a cozy fall twist on traditional baking.
Delicious Ways to Serve It
This bread isn’t just for slicing—it’s a canvas. Here are some of my favorite serving ideas:
- Breakfast: Toast with almond butter, banana slices, and cinnamon.
- Lunch: Make an open-faced avocado tartine with lemon zest and chili flakes.
- Dinner: Serve with soups like this vegan lentil stew or as a side to a warm roasted veggie salad.
- Entertaining: Slice, grill, and serve with hummus, olives, and cashew cheese for a stunning appetizer board.
The beauty of artisan bread is its versatility—it fits every mood, every table, and every occasion.
Frequently Asked Questions (FAQ)
What is the best flour for vegan gluten free artisan bread?
A blend of gluten-free whole grains and starches works best. Brown rice flour provides structure, sorghum adds softness, and tapioca or arrowroot starch gives lift and elasticity. Avoid using only one flour—blends create balance in taste and texture.
How do you get a crusty texture in gluten free bread?
The key is steam and high heat. Baking your dough inside a preheated Dutch oven traps steam, mimicking a bakery-style environment. Removing the lid halfway allows the crust to brown and harden beautifully.
Does gluten free artisan bread need xanthan gum or psyllium husk?
Psyllium husk is preferred over xanthan gum for artisan-style loaves. It forms a gel that mimics gluten’s structure, providing chew and binding without the gumminess some gums introduce. It’s also better tolerated by many.
How can I store homemade vegan gluten free bread to keep it fresh?
Let the bread cool fully before storing. Wrap it in a clean towel or paper bag and keep at room temperature for up to 2 days. For longer storage, slice and freeze. Reheat slices in the toaster or oven to revive crust and softness.
Conclusion
Whether you’re gluten-sensitive, plant-based, or just up for a new baking adventure, this vegan gluten free artisan bread is sure to become a staple in your kitchen. With a golden crust, open crumb, and endless flavor possibilities, it delivers bakery-level results—no wheat, dairy, or eggs required.
Tag me if you bake this! And don’t forget to pin it for later:
👉 Follow on Pinterest

Vegan Gluten Free Artisan Bread: Crusty, Chewy, and Flavor-Packed
- Total Time: 1 hour 20 minutes
- Yield: 1 loaf 1x
Description
A crusty, chewy, and fully plant-based artisan loaf made without gluten, eggs, or dairy. Packed with fiber and flavor, it’s the perfect everyday bread.
Ingredients
1 cup brown rice flour
¾ cup sorghum flour
¾ cup tapioca starch
2 tbsp ground flaxseed
1 tbsp whole psyllium husk
1½ tsp sea salt
1 tbsp maple syrup (optional)
1 packet (2¼ tsp) instant yeast
1½ cups warm water
1 tbsp olive oil
1 tsp apple cider vinegar (optional)
Instructions
1. Activate the yeast in warm water with maple syrup. Let sit until foamy.
2. Create a psyllium gel by mixing husk with water. Let it thicken.
3. Mix dry ingredients in a large bowl.
4. Add yeast mix, psyllium gel, oil, and vinegar to dry mix. Combine well.
5. Let dough rise for 1.5 hours, covered in a warm spot.
6. Shape dough into a round loaf on parchment paper.
7. Optional: Let the shaped loaf rise another 30–45 minutes.
8. Preheat oven with Dutch oven inside to 450°F.
9. Score dough, place into hot pot, cover, and bake 30 mins.
10. Uncover and bake another 25–30 mins until golden brown.
11. Cool on wire rack at least 1 hour before slicing.
Notes
Use psyllium husk for best texture.
Store wrapped in towel for 2 days or freeze slices for freshness.
For variations, add herbs, seeds, or dried fruit during shaping.
- Prep Time: 20 minutes
- Cook Time: 60 minutes
- Category: Bread
- Method: Baking
- Cuisine: Gluten-Free, Vegan
Nutrition
- Serving Size: 1 slice (1/10 loaf)
- Calories: 165
- Sugar: 1g
- Sodium: 210mg
- Fat: 3g
- Saturated Fat: 0.5g
- Unsaturated Fat: 2.5g
- Trans Fat: 0g
- Carbohydrates: 32g
- Fiber: 4g
- Protein: 3g
- Cholesterol: 0mg